This is a list of Bosses found in Dark and Darker.
Automated data is mostly up to date, some minor things are outdated. Hover for more details.Boss last updated on: Patch:6.11#Hotfix 117-1. Dark and Darker is currently on update: Patch:6.11#Hotfix 118.
Banshee,Cave Troll,Cyclops,Frost Wyvern,Ghost King,Lich,Skeleton Royal Guard,Skeleton Warlord Crystal,Skeleton Warlord,Spectral Knight
Experience Points
Banshee,Cave Troll,Cyclops,Frost Wyvern,Ghost King,Lich,Skeleton Royal Guard,Skeleton Warlord Crystal,Skeleton Warlord,Spectral Knight
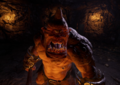
Sometimes curiosity is best left unchecked... but it's too late now.
Description
The Cave Troll is a boss found in the Goblin Caves. His attacks consist of melee attacks at various heights, shouts to slow the player, and a slam with his mace on the floor, dealing massive area of effect damage. The Cave Troll deals high damage, but its attacks are both blockable and dodgeable.
Cave Troll was announced for playtest #4 with the solution of community puzzle
WIP Page
This page is work-in-progress. The information may be lacking, may not be up-to-date, however is not deleted as it provides some useful information or is capable of expansion.
Automated data is mostly up to date, some minor things are outdated. Hover for more details.Boss last updated on: Patch:6.11#Hotfix 117-1. Dark and Darker is currently on update: Patch:6.11#Hotfix 118.
Blinker: Blinded by dirt for 10s[AgT]Stacking Type: Aggregates by Target[1x]Maximum Stacks: 1 Slow: ? for 8s[AgT]Stacking Type: Aggregates by Target[1x]Maximum Stacks: 1 Petrification: ? for 6s [AgT]Stacking Type: Aggregates by Target[1x]Maximum Stacks: 1
Roots player in place, immobilizing them. Lasts 6 seconds
AI
?
Strategy
1. Fight sticking to the right side of him because if you are on the left, some of his attacks may cause the Blindness effect.
2. Try to keep a good distance as most of his attacks have a short range, there is little to no downside of doing so, though do be aware he will blind you if you are out of his range for too long.
3. Always try to get him to go into the animation of the Stomp attack after finishing a Rockfall phase because he will do a stomp after and if you dont get him to do it early, it maybe back you up into a corner which is less room for mobility.
4. If you do get hit by a Stomp debuff then you would want to sheathe your weapon and stay within maximum range of his swing meanwhile strafing to the right and jumping every attack.
Locations
You can check other items, monsters and etc. locations from maps.
Automated data is mostly up to date, some minor things are outdated. Hover for more details.Boss last updated on: Patch:6.11#Hotfix 117-1. Dark and Darker is currently on update: Patch:6.11#Hotfix 118.
Banshee,Cave Troll,Cyclops,Frost Wyvern,Ghost King,Lich,Skeleton Royal Guard,Skeleton Warlord Crystal,Skeleton Warlord,Spectral Knight
Experience Points
Banshee,Cave Troll,Cyclops,Frost Wyvern,Ghost King,Lich,Skeleton Royal Guard,Skeleton Warlord Crystal,Skeleton Warlord,Spectral Knight
Description
Does a projectile attack at close range, enters an eating mode, teleports on the player, applies a stacking debuff, does a slam attack which summons 3 Death Skulls, performs a scream attack at intervals of 20% health loss that hits everyone in the room. Blue circle on the ground will disappear in three minutes.
Curse Of Chilling: Curse Of Chilling Normal Attack: 30(7) Magical + Curse Of Chilling Normal Attack Return: Curse Of Chilling Eating Phase: 140 Move Speed + Eating Shield Eating: Eating Teleport: 20(5) Magical + Curse Of Chilling Scream: 10(4) Magical + Curse Of Chilling Earth Quake: 120.0(6)/180.0(6) Physical, 60.0(6)Magical + Curse Of Chilling
Curse Of Chilling: ? for 8s[AgT]Stacking Type: Aggregates by Target[30x]Maximum Stacks: 30 Eating Shield: 1000 Shield[AgT]Stacking Type: Aggregates by Target Eating: -95% Max Health over 15s[AgT]Stacking Type: Aggregates by Target[1x]Maximum Stacks: 1[Ref]Refresh: Resets on Successful Application
Curse of Chilling = Slows the player and gives a stack of debuff that increases damage taken by Ghost Kings abilities, stacking up to 30
Eating = Increases move speed from 200 to 340 and chases a player. If it reaches them, he applies a status effect that roots a player in place and siphons their health. Dealing 95% Max hp as damage over 15 seconds, stacking Curse of Chilling on player and gaining 1000 hp shield
Elite Ghost King deals 50% more damage
AI
Scream pattern
Condition
- when a player dies
- every time HP is reduced by 20% (4 total)
Earthquake pattern
Condition
- after 40 seconds of cooldown have passed.
Eating pattern
Condition
- When the normal attack or teleport has been used 4 to 7 times
Target
- highest aggro player
- furthest player
Teleport pattern
Condition
- teleport probability check
Probability
- if success to teleport than decrease probability 20%
- if fail to teleport than increase probability 15%
Target
- if player with aggro values whose distance is greater than 500 and less than 3000
- furthest player
Normal attack pattern
Target
- 75% probability, highest aggro player
- second highest player
- nearest player
Description
- if target is within 500, rotate to target
- if not, move to target and rotate
- if after 3 second passed, select new action
Guide
Ghost located in Inferno. He can be spotted waiting alone in the middle of the room. As soon as a player walks in to the room he will engage with his Teleport Attack or walk to the first player that aggroes him to perform the Orb Throw Attack.
Preparation
The most important aspect of this fight is team composition. Most optimal team currently is 1 Cleric and 2 Ranger as this gives you sustain with cleric's heals and high DPS with rangers. Optionally you can substitute one Ranger for another class such as bard, because Shriek of Weakness increases DPS from physical sources significantly.
You will be required to bring a decent amount of Healing potions to recover from the Screams. However, it should be noted that Potion of Protections do not work due to it only blocking physical damage. It is very important your Cleric has all his spells available prior to this fight so bringing Campfires is essential.
When it comes to equipment quality for each player, you will need better gear than your basic gear but you do not need all legendries.
If you also have any of the skeleton skins that was available through Shop it is very helpful since it gives +10 Magic Resistance.
Roles:
Ranger
As a Ranger you are the main damage dealer of this comp.
You need to position far away from the Ghost King and keep rotation around as cursed circles appear.
If you do get low do not forget to keep your potions up and ask for heals from your cleric
If you are running a bow you have to run Quickshot as it deals a burst of damage. Optionally for more damage you can add Multishot and if not use Field Ration for sustain.
Barbarian(Melee)
As a Melee DPS you need to be very cautious of getting stacks of Curse of Chilling.
It is harder for you to run away from Eating ability so pay close attention to the blue bubble that will appear around Ghost King and start running away even if you cannot tell if it is aggroed to you.
Cleric
You are the pillar of this comp, without you it is very difficult for your allies to stay alive.
Make sure all your abilities are available and communicate with your team how much you have left.
Pay very close attention to the abilities Ghost King is casting and time your heals and buffs efficiently. For example do not try to heal or buff when Ghost King is getting ready for Earthquake.
Select both healing spells and some buff spells depending on your spell capacity.
The Protection from Evil perk will reduce the duration of Curse of Chilling by 30%.
Encounter
As you enter the room Ghost King will teleport to the first player that has entered the room and will leave a Curse pool after doing his teleport attack. This is easily avoidable by just running by it or waiting for it attack. He will repeat this move through out the fight. It is recommended to stay apart from your teammates and far to the edges of arena to prevent it from being covered by Curse Pools.
Ghost King will also do a Scream attack doing damage to everyone in the arena amplified by the amount of Curse stacks you have. This attack is unavoidable.
Sometimes he will do his Orb Attack shooting 5 orbs towards a player that will hit for 30 Magical Damage each orb. If you get hit by a orb, a Curse pool will spawn on the ground nearby, make sure to move away to avoid getting Curse stacks.
Occasionally, he will cast a bubble around himself and start chasing a player. If the player gets caught he will start draining its health. To avoid this press x to unsheathe your weapon and run. If you get caught your cleric needs to heal you for you to be able to survive. In the case you get drained on a Curse Pool, you will die.
Lastly and most importantly, his Earthquake ability will one shot anyone in the room that does not jump in time. To perfectly time the jump you need to pay attention to his head and when you spot blue sparks that's when you need to jump. If you survived the jump Ghost King will spawn 3 Death Skulls. Running Holy Prufication on your Cleric will one shot these.
Ghost King Eat
Ghost King Jump
Ghost King Orbs
Ghost King Scream
Ghost King Teleport
High Roller Ghost King will be nearly identical in mechanics but will have more HP and deal more damage and spawn nightmare Death Skulls instead of elite ones on the jump attack.
Video
Notes
Extra Notes:
When the Ghost King teleports, he turns invisible, teleports, then becomes visible again. While invisible, he can still be hit.
Damage Immunity
After Screaming and during Earthquake, Ghost King is completely immune to damage the same way that Skeleton Mage can cast an immunity bubble.
A common misconception is that this immunity is actually 100% damage reduction such that using Penetration or Bard's Shriek of Weakness will allow it to be damaged. This is NOT the case.
Some users have reported cases where the boss is killed while the Red immunity bubble is active.
The Red bubble of immunity starts to fade away at the same time that the immunity is actually lost, meaning the boss can be damaged while the bubble fades away which seems to be a roughly 0.5s animation.
History
Ghost King's attacks now deal magic damage instead of true magical damage. Unknown date.
Automated data is mostly up to date, some minor things are outdated. Hover for more details.Boss last updated on: Patch:6.11#Hotfix 117-1. Dark and Darker is currently on update: Patch:6.11#Hotfix 118.
Close Attack: 70(5) Magical Normal Attack: 100(5) Magical Strong Attack: 200(7) Magical Curse Of Gathering Mark: -95%(4) True Max Health Dmg1 or -50%(4) Dmg2 or -15%(4) Dmg3 or -5%(4) Dmg4 or -2%(4) Dmg5 + CoG Mark Icon, CoG Heal1-5 Curse Of Isolation Mark: -50%(4) True Max Health Dmg1 or -70%(4) Dmg2 or -90%(4) Dmg3 or -150%(4) Dmg4 or -250%(4) Dmg5 + CoI Mark Icon, CoI Heal1-5 Getting Soul: Soul Shield Frenzy: Death Swarm, Frenzy
CoG Mark Icon: ? for 5s[AgT]Stacking Type: Aggregates by Target[1x]Maximum Stacks: 1 CoG Heal1: 65% Max Health over 20s CoG Heal2: 35% Max Health over 20s CoG Heal3: 10% Max Health over 20s CoG Heal4: 4% Max Health over 20s CoG Heal5: 2% Max Health over 20s CoI Mark Icon: ? for 5s[AgT]Stacking Type: Aggregates by Target[1x]Maximum Stacks: 1 CoI Heal1: 35% Max Health over 20s CoI Heal2: 50% Max Health over 20s CoI Heal3: 60% Max Health over 20s CoI Heal4: 100% Max Health over 20s CoI Heal5: 170% Max Health over 20s Soul Shield: 250 Shield[AgT]Stacking Type: Aggregates by Target Death Swarm: 4 True Magical Damage [AgT]Stacking Type: Aggregates by Target[5x]Maximum Stacks: 5[Ref]Refresh: Resets on Successful Application Frenzy: 25% Move Speed, 20% Damage [inf]Duration: Infinite[AgT]Stacking Type: Aggregates by Target[1x]Maximum Stacks: 1
Launches a homing projectile that follows the target player at 2 meters per second until it hits something (players seem to move at a base of 3 meters per second).
Soul Steal = Uses the soul of your fallen teammates to cast a protective barrier on himself that absorbs 250 damage.
Curse of Isolation = Spawns a blue circle underneath the player that detonates after 5 seconds. The circle will deal more damage as the number of players are inside it increase. Heals back some amount of damage over 20 seconds.
1 person = 50% Max Health True Damage + 35% Max Health Heal
2 people = 70% Max Health True Damage + 50% Max Health Heal
3 people = 90% Max Health True Damage + 60% Max Health Heal
4 people = 150% Max Health True Damage
5 people = 250% Max Health True Damage
Curse of Gathering = Spawns a purple circle underneath the player that detonates after 5 seconds. The circle will deal less damage as the number of players are inside it increase. Heals back some amount of damage over 20 seconds.
1 person = 95% Max Health True Damage + 65% Max Health Heal
2 people = 50% Max Health True Damage + 35% Max Health Heal
3 people = 15% Max Health True Damage + 10% Max Health Heal
4 people = 5% Max Health True Damage + 3.5% Max Health Heal
5 people = 2.5% Max Health True Damage + 1.5% Max Health Heal
High Roller
Death Swarm = Casts a purple death swarm with a safe zone in the middle, being outside the safe zone deals 4 magic damage per second. Furthermore, buffs any living skeleton with Frenzy. 60 seconds cooldown
Frenzy = Applies a buff to the skeletons that increases movement speed by 50% and attack speed 25% for 60 seconds. Also increasing skeletons damage by 20 physical damage.
Damage does not change between High Roller and normal Lich, nor do the minions (unless frenzied by the Lich).
AI
Resurection pattern
Condition
cooldown 60sec
one or more skelton archers or guards have killed and one more player within 2000
Soul steal pattern
Condition
player corpse is within 2000
Curse of X pattern
Target
random player within 2000
Condition
every time HP decrease by 20%
Strong attack pattern
Target
furthest player
Condition
phase value more than 1000
Description
if target is within 1000, rotate to target
if not, move to target and rotate
if after 3 second passed, select new action
Close attack pattern
Condition
70% Probability
random player within 250
Result
Increase phase 150 ~ 200
Normal attack pattern
Target
if with a 80% probability, select highest aggro player
if not, second highest aggro player
if not, nearest player
Description
if target is within 800, rotate to target
if not, move to target and rotate
if after 3 second passed, select new action
Result
Increase phase value 225 ~ 275
Guide
Lich can be located in the Crypts map. He can be spotted waiting alone in the middle of the room. As soon as a player walks in to the room Lich will resurect 3 Skeleton Archers and 3 Skeleton Guardsman.
Preparation
The team composition for this fight is very flexible. It is possible to complete Lich with 3 DPS classes but this is very risky due to Lich's strongest abilities, curse of gathering and isolation, triggering at each 20% percentage of its HP. This means killing Lich too fast is not optimal.
You can bring decent amount of Healing potions. However, it should be noted that Potion of Protections do not work due to it only blocking physical damage, but can be useful against skeleton archers and guardsman. It is recommended to bring Campfires to replenish health and spells before the fight.
When it comes to equipment quality for each player, at least rare weapons are recommended.
Encounter
As you approach, the Lich will raise the 3 Skeleton Archers and 3 Skeleton Guardsmen lying around him. These skeletons behave like their regular counterparts, but have significantly more HP. After raising his minions, the Lich will then target a player, walking toward them until in range to use his Normal attack.
The Lich's Normal Attack is a fast projectile aimed at the target's head. This projectile explodes on contact with any character or object, dealing unblockable splash damage to all targets in the area. Even if you dodge the projectile, you may still be hit by the splash if the projectile hits a wall directly behind you, or a nearby Guardsman's shield, etc.
The Lich's Strong Attack is a slow projectile that will home in on the target player until it collides with a character or shield, dealing massive damage to the character it hits, if any. This projectile can be blocked without taking damage.
Sometimes, if there is an enemy in melee range, the Lich will use his Close Attack, damaging nearby players and knocking them back.
The Lich will periodically use Resurrection to re-raise all fallen minions. This can be cast even if all skeletons are still alive.
At every 20% of his max HP, the Lich will randomly cast either Curse of Isolation or Curse of Gathering on a single player. Both of these will create a colored, glowing circle that moves with the target and eventually explodes, dealing a heavy amount of % Max Health True Damage. You will then receive a buff healing back some of the health lost over time.
Curse of Gathering is the purple circle. Its damage decreases with the number of players inside the circle when it explodes.
Curse of Isolation is the blue circle. Its damage increases with the number of players inside the circle when it explodes.
If a player dies at any point during the fight, the Lich will cast Soul Steal, gaining a protective barrier. The barrier will block some amount of damage then disappear.
When the Lich dies, all remaining skeletons immediately die with him.
Lich Normal Attack
Lich Strong Attack
Lich Close Attack
Lich Resurrection
Lich Curse of Gathering
Lich Curse of Isolation
Lich Soul Steal
Loot
Lich will drop 3 items from drop table and 1 from Misc table (High Roller will drop better loot). There will also be some chests in the room that can be looted but most importantly the room will have a change spawn a Treasure which will give you the ability to loot indefinitely as long as you have space in your inventory.
High Roller
High Roller Lich will have an additional ability. Lich will cast Death Swarm, a very large purple circle that is similar color to Curse of Gathering but it will not do damage to the players that is inside it rather do 4 magic damage per second to the players outside of it. The circle will buff any Skeletons inside it giving it bonus attack and movement speed.
Lich Death Swarm
Video
Notes
It is possible to do enough burst damage that the Lich casts multiple Curses before the first has expired, potentially stacking on the same target.
WIP Page
This page is work-in-progress. The information may be lacking, may not be up-to-date, however is not deleted as it provides some useful information or is capable of expansion.
Automated data is mostly up to date, some minor things are outdated. Hover for more details.Boss last updated on: Patch:6.11#Hotfix 117-1. Dark and Darker is currently on update: Patch:6.11#Hotfix 118.
Banshee,Cave Troll,Cyclops,Frost Wyvern,Ghost King,Lich,Skeleton Royal Guard,Skeleton Warlord Crystal,Skeleton Warlord,Spectral Knight
Experience Points
Banshee,Cave Troll,Cyclops,Frost Wyvern,Ghost King,Lich,Skeleton Royal Guard,Skeleton Warlord Crystal,Skeleton Warlord,Spectral Knight
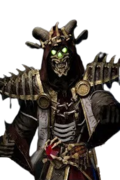
Description
Summons an army of skeleton rogues to his aid, traps players if they walk in certain areas, swings at players with his sword, throws throwing knives at various intervals. The High Roller version gains a roomwide attack which can only be avoided by standing in the highlighted safe zone or leaving the room. Additionally, it will spawn 3 rotating (and destroyable) crystals which emit damaging beams towards the center of the room.
Paralyze: ? for 15s[AgT]Stacking Type: Aggregates by Target[5x]Maximum Stacks: 5 Dominated Player: ? for 6s[AgT]Stacking Type: Aggregates by Target[6x]Maximum Stacks: 6[Exp]Expiration: Removes Single Stack and Refreshes Duration
Move Speed Bonus: -15% debuff for 15 seconds, stacking up to 5
Soul Steal = Absorbs the souls of fallen players and unkilled minions to increase his action and movement speed, PDR and MDR, as well as his sword length:
Realm of Domination = AoE zone creating paralyzing Bone Prisons for 6 seconds unless destroyed first.
High Roller only
Roomwide instakill attack with small safe spot
Spawns 3 crystals emitting damaging beams towards the center of the room. Destroyable.
Encounter
This fight can be broken up into 2 alternating phases based on when the Warlord has his shield up or down. The fight always starts with Phase 1.
Phase 1
The Warlord starts by shielding himself, becoming immune to all damage. He will then run (if close enough) or teleport to the center of the room and become immobile for the rest of the phase.
Afterward, the Warlord will summon 8 Skeleton Royal Guards which will climb out of random locations in the ground. Like any other Skeleton, these will pursue a target and attempt to stab them, but they can be killed and will not respawn until the next cycle. Each Guard will be connected to the Warlord by a glowing chain, but this is purely a visual effect which disappears once the corresponding Guard is defeated.
After summoning, the Warlord will use a different ability every few seconds in a fixed order. All of these aside from the last involve targeting a player, facing them, and either extending his off-hand or pointing his sword. This animation does not deal damage.
First, the Warlord will use Realm of Domination, marking a cone-shaped area in the target's direction for 120s, persisting through phases. Standing in one of these areas will give you 1 stack of the Dominated debuff every .5s, refreshing the 6s duration each time. Stacks fall off one at a time, and losing a stack also refreshes the duration. If you reach 6 stacks they will be consumed, and you will become encased in a Bone Prison. While imprisoned, you will not gain Dominated stacks, but you will be unable to move. The Prison can be attacked and will crumble once it takes enough damage.
Second, the Warlord will command a random Guard to teleport to the target on the side furthest from the Warlord and immediately attack.
Third, the Warlord will command all Guards to throw a knife at the target's head.
After that, the Warlord will repeat the above three abilities once each in the same order.
Finally, the Warlord will signal to all remaining Guards each of which will simultaneously use their Soul Pass ability, die, and explode, dealing heavy damage to anything nearby. Each soul grants the Warlord one stack of the Speed Up buff which provides +4% Move Speed, +1.2% Action Speed, +2% Physical Damage Reduction, and +1% Magical Damage Reduction per soul absorbed. The size of the glowing aura around his sword and thus his reach will also increase. This buff persists through phases and stacks up to 25.
This phase lasts ~35 seconds or until all Guards are defeated.
Phase 2
Having (possibly) powered up by absorbing any remaining Guards' souls, the Warlord will drop his shield and start running after targets, attacking them when in range. He may also choose to stand still and gesture with his off-hand. After extending his hand, he will teleport behind a target before immediately attacking.
The Warlord's damaging attacks primarily consist of a variety of close-range sword slashes. He also has a spin attack in which instead of using his sword, he uses his off-hand to throw a total of 12 knives all at once in a circle; one knife forward, one back, one to each side, and the remaining 8 knives divide each quadrant formed by the first four knives into thirds, leaving each knife separated by 30 degrees. Each of these attacks can occur individually, in which case the Warlord will return to a neutral standing pose briefly before acting again. These attacks can also be chained together, in which case the Warlord will skip the animation returning him to his neutral pose and attack again immediately. The Warlord can combo this way up to 6 times in a row, possibly more.
This phase lasts 35 seconds.
Video Guides
debug attempt
Automated data is mostly up to date, some minor things are outdated. Hover for more details.Boss last updated on: Patch:6.11#Hotfix 117-1. Dark and Darker is currently on update: Patch:6.11#Hotfix 118.
Banshee,Cave Troll,Cyclops,Frost Wyvern,Ghost King,Lich,Skeleton Royal Guard,Skeleton Warlord Crystal,Skeleton Warlord,Spectral Knight
Experience Points
Banshee,Cave Troll,Cyclops,Frost Wyvern,Ghost King,Lich,Skeleton Royal Guard,Skeleton Warlord Crystal,Skeleton Warlord,Spectral Knight
Sometimes curiosity is best left unchecked... but it's too late now.
Description
The Cave Troll is a boss found in the Goblin Caves. His attacks consist of melee attacks at various heights, shouts to slow the player, and a slam with his mace on the floor, dealing massive area of effect damage. The Cave Troll deals high damage, but its attacks are both blockable and dodgeable.
Cave Troll was announced for playtest #4 with the solution of community puzzle
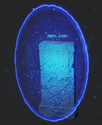
Static Escape Portals appear as pedestals with a blue glow on the ground. After some time they will emerge from the ground as a set of 3.
Each of the 3 count as a completely separate Prop, so activating more than 1 from a set will grant more AP/Exp.
You can check Escape Portals Locations on the Map.


