From Dark and Darker Wiki
(→Ruins) |
m (link to /Ranks to /Adventure Rank) |
||
| (19 intermediate revisions by 5 users not shown) | |||
| Line 1: | Line 1: | ||
<metadesc>Dark and Darker Wiki Dungeons Guide. High Roller Dungeon, Enemies, Leaderboards, Difficulties and more...</metadesc> | <metadesc>Dark and Darker Wiki Dungeons Guide. High Roller Dungeon, Enemies, Leaderboards, Difficulties and more...</metadesc> | ||
=Dungeons= | |||
Currently, there's four dungeons in Dark and Darker. The Goblin Caves, The Howling Crypts and Inferno [https://darkanddarker.map.spellsandguns.com/ maps] have different layouts and the mobs are different for each dungeon. | |||
[[Goblin Cave|The Goblin Caves]] (GC) - "A newly discovered cave system found near the tavern. What dangers lurk below?". | |||
[[Ruins|The Ruins]] - "The remains of an impenetrable fortress besieged by a disturbing area". | |||
[[Crypt|The Howling Crypts]] - Only accessible through the red portals found in The Ruins. | |||
[[Inferno]] - Only accessible through the red portals found in The Howling Crypts. | |||
All the dungeons can be played in 1, 2 and 3 players queues. | |||
High-Roller (HR) Dungeons: | |||
These are higher difficulty versions of the dungeons and will have higher quality loot, also you can earn Adventure Points for your Rank. Every single enemy will be Elite or Nightmare. | |||
[[Goblin Cave|The Goblin Caves HR]] (GC) - "This dungeon is for the elite adventurer. The goblins do not take kindly to uninvited guests. If you make it out alive, your name will be written in the annals of history". | |||
[[Ruins|The Ruins HR]] - "Hidden within a shadowy forest, the ruins of a massive castle hold deep mysteries. Fantastic creatures and terrifying monsters await unlucky adventurers looking for untold treasures. If you make it out alive your renown will be endless!". | |||
[[Crypt|The Howling Crypts HR]] - Only accessible through the red portals found in The Ruins | |||
[[Inferno|Inferno HR]] - Only accessible through the red portals found in The Howling Crypts. | |||
===Goblin Cave=== | |||
==Goblin Cave== | |||
[[File:Goblin Cave.png|right|x250px]] | [[File:Goblin Cave.png|right|x250px]] | ||
[[Goblin Cave]] is the only "Solo" dungeon in the game at the moment. | [[Goblin Cave]] is the only "Solo" dungeon in the game at the moment. | ||
Ores spawn in the Caves: | |||
*[[File:Cobalt Ore.png|x100px]] [[Cobalt Ore]] | *[[File:Cobalt Ore.png|x100px]] [[Cobalt Ore]] | ||
*[[File:Rubysilver Ore.png|x100px]] [[Rubysilver Ore]] | |||
*[[File:Iron Ore.png|x100px]] [[Iron Ore]] | |||
*[[File:Copper Ore.png|x100px]] [[Copper Ore]] | |||
. | |||
Many new monsters spawn here, such as: | Many new monsters spawn here, such as: | ||
| Line 51: | Line 46: | ||
<br> | <br> | ||
Bosses: | |||
*[[Cave Troll]] | *[[Cave Troll]] | ||
*[[Cyclops]] | |||
<br> | <br> | ||
| Line 59: | Line 55: | ||
==Ruins== | ==Ruins== | ||
[[File:The Ruins.png|right|x250px]] | [[File:The Ruins.png|right|x250px]] | ||
[[Ruins]] | [[Ruins]] Starting floor. | ||
*[[Wisp]] | *[[Wisp]] | ||
*[[Dire Wolf]] | *[[Dire Wolf]] | ||
mini-bosses: | |||
* [[Giant Worm]] | * [[Giant Worm]] | ||
* [[Golem]] | |||
To learn more about monsters, check [[Enemies|Monsters]] | To learn more about monsters, check [[Enemies|Monsters]] | ||
| Line 73: | Line 69: | ||
==Crypt== | ==Crypt== | ||
[[File:Crypt.png|right|x250px]] | [[File:Crypt.png|right|x250px]] | ||
The [[Crypt]] is | The [[Crypt]] is a second level dungeon accessible from [[Ruins|The Ruins]]. | ||
Taking red portals from [[Ruins|The Ruins]] leads to the [[Crypt]]. | |||
Ores spawns in the Crypt: | |||
*[[File:Cobalt Ore.png|x100px]] [[Cobalt Ore]] | |||
*[[File:Rubysilver Ore.png|x100px]] [[Rubysilver Ore]] | *[[File:Rubysilver Ore.png|x100px]] [[Rubysilver Ore]] | ||
*[[File:Iron Ore.png|x100px]] [[Iron Ore]] | |||
*[[File:Copper Ore.png|x100px]] [[Copper Ore]] | |||
<br> | <br> | ||
Mini bosses that spawn in the Crypt: | |||
*[[Wraith]] | *[[Wraith]] | ||
*[[Skeleton Champion]] | *[[Skeleton Champion]] | ||
| Line 103: | Line 102: | ||
*[[Ghost King]] | *[[Ghost King]] | ||
*[[Skeleton Warlord|Skeleton Warlord]] | *[[Skeleton Warlord|Skeleton Warlord]] | ||
=Traps= | |||
Watch your step, the dungeons are riddled with traps in order to protect it's valuable treasures. You will encounter 3 kinds of traps during your adventures, wall spikes, swinging axe traps and floor spike traps. | Watch your step, the dungeons are riddled with traps in order to protect it's valuable treasures. You will encounter 3 kinds of traps during your adventures, wall spikes, swinging axe traps and floor spike traps. | ||
* Swinging Axe Traps does 25 HP Damage | * Swinging Axe Traps does 25 HP True Damage | ||
* Wall Spikes Traps does 20 HP Damage | * Wall Spikes Traps does 20 HP True Damage | ||
* Floor Spikes Traps does 20 HP Damage | * Floor Spikes Traps does 20 HP True Damage | ||
<div style="display:flex; justify-content: space-evenly; flex-wrap:wrap; padding:2%;"> | <div style="display:flex; justify-content: space-evenly; flex-wrap:wrap; padding:2%;"> | ||
| Line 131: | Line 128: | ||
Use these traps to your advantage to eliminate monsters or unsuspecting players. | Use these traps to your advantage to eliminate monsters or unsuspecting players. | ||
=Portals= | |||
{{Transclude|Portals#Escape Portal}} | |||
{{Transclude|Portals#Down Portal}} | |||
For Portal Spawn Times, see [[Portals#Portal_Spawn_Times|Portals]] | |||
=Escaping= | |||
Escaping is possible when a player activates an [[Escape Portal]]. The player then has the option to escape the map. These portals will appear at any level, decreasing in numbers as you dwell deeper. In [[Goblin Cave]], there is [[Cave Extract]] which allows 1 person to escape. | Escaping is possible when a player activates an [[Escape Portal]]. The player then has the option to escape the map. These portals will appear at any level, decreasing in numbers as you dwell deeper. In [[Goblin Cave]], there is [[Cave Extract]] which allows 1 person to escape. | ||
When a player escapes they will keep everything in their inventory and additionally they will get [[Adventure | When a player escapes they will keep everything in their inventory and additionally they will get [[Adventure_Rank#Adventure_Points|Adventure Points]] for their [[Adventure Rank]] depending on how many [[Monsters]] they have killed, items that were looted, players killed, and other factors. Also, you will keep 100% of the [[Experience]] that you have earned. | ||
In case you die, you will only get rewarded 50% of the [[Experience]] you have earned and will lose all Adventure | In case you die, you will only get rewarded 50% of the [[Experience]] you have earned and will lose all [[Adventure_Rank#Adventure_Points|Adventure Points]] collected. Furthermore, you will lose all equipment including your tools and inventory. Currently there is no way to secure your loot. | ||
=Shrines= | |||
{{:Shrines#Shrines}}<!-- This part can be edited in "Shrines" page --> | |||
=Death Swarm= | |||
The dungeons below are protected by a powerful curse. The Death Swarm will try to consume your soul. Heed the mini-map and avoid its oppressive clutch. | The dungeons below are protected by a powerful curse. The Death Swarm will try to consume your soul. Heed the mini-map and avoid its oppressive clutch. | ||
| Line 171: | Line 163: | ||
Check individual [[Dungeon#Dungeons|Dungeon]] page to see their death swarm timings. | Check individual [[Dungeon#Dungeons|Dungeon]] page to see their death swarm timings. | ||
=Monsters= | |||
[[File:Skeleton Footman.png|right|x250px]] | [[File:Skeleton Footman.png|right|x250px]] | ||
| Line 189: | Line 181: | ||
=Treasures= | |||
During your adventures you will come across a vast variety of treasures of varying sizes and value. These treasures can be sold to [[The Collector]] in exchange for gold coins. As of now, larger treasures take up a lot of inventory space, but have poor gold value per inventory slot. Try picking up single slot treasures if possible, since these occupy the least amount of inventory space and therefore have the highest gold value per inventory slot. | During your adventures you will come across a vast variety of treasures of varying sizes and value. These treasures can be sold to [[The Collector]] in exchange for gold coins. As of now, larger treasures take up a lot of inventory space, but have poor gold value per inventory slot. Try picking up single slot treasures if possible, since these occupy the least amount of inventory space and therefore have the highest gold value per inventory slot. | ||
| Line 204: | Line 196: | ||
=Leaderboards= | |||
High Roller Dungeons are the only way to obtain a spot on the leaderboard. The leaderboards | High Roller Dungeons are the only way to obtain a spot on the leaderboard. The leaderboards have been changed to a single leaderboard system based on Adventure points. Earn adventure points by doing various actions in the dungeon, killing monsters and players alike and extracting with valuable treasure. Be careful however, because failing to extract will cause you to lose all the Adventure Points you accumulated during your run. | ||
For more detailed information, check [[Adventure_Rank]]. | |||
=Karma= | |||
[[File:karma.png|right|x300px]] | [[File:karma.png|right|x300px]] | ||
The Karma system, located at the bottom-right corner of the main screen, enables players to rate their teammates from past games. This feature serves as a trust indicator, helping players make informed decisions about whom to collaborate with in future games. Upvotes increase player's karma score by 1, downvotes decrease it by 1. Players can vote once every 5 portal usage. | The Karma system, located at the bottom-right corner of the main screen, enables players to rate their teammates from past games. This feature serves as a trust indicator, helping players make informed decisions about whom to collaborate with in future games. Upvotes increase player's karma score by 1, downvotes decrease it by 1. Players can vote once every 5 portal usage. | ||
| Line 225: | Line 214: | ||
*-4 Karma = <span style="color:#ED9D9C">Light Red </span> | *-4 Karma = <span style="color:#ED9D9C">Light Red </span> | ||
*-20 Karma = <span style="color:red">Red</span> | *-20 Karma = <span style="color:red">Red</span> | ||
Revision as of 22:55, 20 March 2024
Dungeons
Currently, there's four dungeons in Dark and Darker. The Goblin Caves, The Howling Crypts and Inferno maps have different layouts and the mobs are different for each dungeon.
The Goblin Caves (GC) - "A newly discovered cave system found near the tavern. What dangers lurk below?".
The Ruins - "The remains of an impenetrable fortress besieged by a disturbing area".
The Howling Crypts - Only accessible through the red portals found in The Ruins.
Inferno - Only accessible through the red portals found in The Howling Crypts.
All the dungeons can be played in 1, 2 and 3 players queues.
High-Roller (HR) Dungeons:
These are higher difficulty versions of the dungeons and will have higher quality loot, also you can earn Adventure Points for your Rank. Every single enemy will be Elite or Nightmare.
The Goblin Caves HR (GC) - "This dungeon is for the elite adventurer. The goblins do not take kindly to uninvited guests. If you make it out alive, your name will be written in the annals of history".
The Ruins HR - "Hidden within a shadowy forest, the ruins of a massive castle hold deep mysteries. Fantastic creatures and terrifying monsters await unlucky adventurers looking for untold treasures. If you make it out alive your renown will be endless!".
The Howling Crypts HR - Only accessible through the red portals found in The Ruins
Inferno HR - Only accessible through the red portals found in The Howling Crypts.
Goblin Cave

Goblin Cave is the only "Solo" dungeon in the game at the moment.
Ores spawn in the Caves:


.
Many new monsters spawn here, such as:
Bosses:
To learn more about monsters, check Monsters
Ruins

Ruins Starting floor.
mini-bosses:
To learn more about monsters, check Monsters
Crypt

The Crypt is a second level dungeon accessible from The Ruins.
Taking red portals from The Ruins leads to the Crypt.
Ores spawns in the Crypt:
Mini bosses that spawn in the Crypt:
Inferno

Inferno is the most difficult dungeon in the game at the moment, featuring some dangerous monsters, mini-bosses and bosses that can't be found anywhere else. It can be reached by using the down portal from the Crypt Dungeon.
While it is the most difficult dungeon, it is also the smallest dungeon. The center piece room of this dungeon always houses one of the bosses.
Many new monsters spawn here, such as:
Also end game bosses:
Traps
Watch your step, the dungeons are riddled with traps in order to protect it's valuable treasures. You will encounter 3 kinds of traps during your adventures, wall spikes, swinging axe traps and floor spike traps.
- Swinging Axe Traps does 25 HP True Damage
- Wall Spikes Traps does 20 HP True Damage
- Floor Spikes Traps does 20 HP True Damage
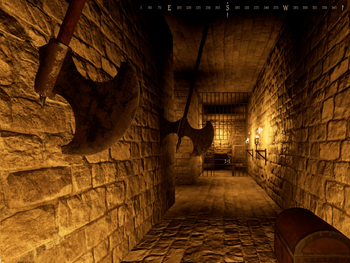
Swinging Axe Traps

Wall Spikes Traps

Floor Spikes Traps
As opposed to it's dormant spiky brethren, axe traps are always active. Take your time to navigate through axe traps, if you are not in a hurry, it's better to wait for the right moment to traverse instead of risking to take avoidable damage.
Wall spike traps are difficult to detect, as only a small hole is visible on the wall. Some of them are depicted on the mini-map, but you will take some unavoidable deaths while you learn the locations of the hidden ones. They are positioned at head level and spring into action when something get's too close. Simply crouch down to avoid them. Some sneaky wall spike traps are at knee height, however, these are only found in the maze.
Floor spikes are usually easy to spot, they can sometimes be hidden in dak areas, but generally it's easy to navigate around them. Alternatively, you can throw a torch onto them to activate the mechanism and wait for the moment the spikes go back down. There is a brief recharge time after the spikes have fully retracted before they can spring out again, use this downtime to walk over them for a short distance and leap away to safety before the spikes come out again.
Use these traps to your advantage to eliminate monsters or unsuspecting players.
Portals
Escape Portals will appear in a random place in the map, allowing a single person out of the dungeon. They can also appear as a set of 3 Escape Portals, allowing one person each.
There are also Static Escape Portals emitting a blue glow when they open that will appear in particular spots on the Map, allowing a single person out of the dungeon.

Down Portals will appear in a random place in the map in sets of three, allowing up to 3 players to descend, each of these individual portals only allow one player to descend at a time.
There are also Static Down Portals emitting a red glow when they open that will appear in particular spots on the Map, allowing an infinite number of people to descend.

For Portal Spawn Times, see Portals
Escaping
Escaping is possible when a player activates an Escape Portal. The player then has the option to escape the map. These portals will appear at any level, decreasing in numbers as you dwell deeper. In Goblin Cave, there is Cave Extract which allows 1 person to escape.
When a player escapes they will keep everything in their inventory and additionally they will get Adventure Points for their Adventure Rank depending on how many Monsters they have killed, items that were looted, players killed, and other factors. Also, you will keep 100% of the Experience that you have earned.
In case you die, you will only get rewarded 50% of the Experience you have earned and will lose all Adventure Points collected. Furthermore, you will lose all equipment including your tools and inventory. Currently there is no way to secure your loot.
Shrines
Shrines
There are currently 5 types of shrines which each give a specific buff.
The following shrines will regenerate over 3 minutes:
- Shrine Of Protection: Grants a protective buff of 5% Physical and Magical Damage Resistance for 60s.
- Fountain Of Speed: Grants a speed buff of extra 10 movement speed for 60s.
- Shrine Of Health: Restores 100 HP.
- Shrine Of Power: Grants a damage buff of 15 Physical Power for 60s.
The following shrines are one-time use:
- Altar of Sacrifice: Allows you to resurrect fallen players at the cost of some of your own health. You will need to equip the Soul Heart of the fallen player to be able to begin the resurrection process.
Using any shrine gives 2 Experience.

Shrine Of Protection

Fountain Of Speed

Shrine Of Health

Shrine Of Power

Altar Of Sacrifice
Death Swarm
The dungeons below are protected by a powerful curse. The Death Swarm will try to consume your soul. Heed the mini-map and avoid its oppressive clutch. The circle will slowly move closer towards the white circle indicated on the mini-map. If you are caught in the red zone you will slowly start taking 1 damage per second, each circle phase increases the damage. However, if you are in the last circle and cannot find a portal in time before the circle fully closes, then you will instantly die.

Death Swarm

Red Zone
Check individual Dungeon page to see their death swarm timings.
Monsters

There is a vast variety of monsters you will encounter depending on the room you enter and map you get into.
The lower level the dungeon, the harder the monsters become and different types of monsters start to appear.
Monsters also have 3 different variants:
- Common
- Elite
- Nightmare
With each variety increase, the enemy gets stronger, tougher and faster, can use new moves.
Nightmare monsters have an extremely low spawn chance on normal difficulty dungeons.
Treasures
During your adventures you will come across a vast variety of treasures of varying sizes and value. These treasures can be sold to The Collector in exchange for gold coins. As of now, larger treasures take up a lot of inventory space, but have poor gold value per inventory slot. Try picking up single slot treasures if possible, since these occupy the least amount of inventory space and therefore have the highest gold value per inventory slot.
Pickaxes can be used for mining.
If you want to check out the individual values, you can check Treasures.
You can get more loot information in Lootables, Containers, and Monsters. Make sure to check their individual pages for their loot tables.
You can also find where an item drops in their own pages. For example, check Golden Key#Drop_Table to see where it drops.
Leaderboards
High Roller Dungeons are the only way to obtain a spot on the leaderboard. The leaderboards have been changed to a single leaderboard system based on Adventure points. Earn adventure points by doing various actions in the dungeon, killing monsters and players alike and extracting with valuable treasure. Be careful however, because failing to extract will cause you to lose all the Adventure Points you accumulated during your run.
For more detailed information, check Adventure_Rank.
Karma

The Karma system, located at the bottom-right corner of the main screen, enables players to rate their teammates from past games. This feature serves as a trust indicator, helping players make informed decisions about whom to collaborate with in future games. Upvotes increase player's karma score by 1, downvotes decrease it by 1. Players can vote once every 5 portal usage.
Scores and Colors:
- 20 Karma = Blue
- 4 Karma = Light Blue
- 0 Karma = White
- -4 Karma = Light Red
- -20 Karma = Red