From Dark and Darker Wiki
This page is a work in progress. Erroneous information and formatting bugs are to be expected.Prop Data last updated on: Work in Progress.
Dark and Darker is currently on update: Patch:6.11#Hotfix 119.
Currently, there is only one type of portals in the game, blue Escape Portals, allowing players to extract from the dungeon.
How to Use
Locate the portal and initiate its activation by pressing the F key. Once activated, a blue circle will materialize over 1-2 seconds. Once the portal is fully materialized, you can instantly escape by coming into contact with the portal.
It's crucial to exercise caution and be mindful of your surroundings, as any disruptions or enemy attacks while activating the portal could thwart your escape.
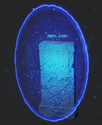
Escape Portal
Static Escape Portals appear as pedestals with a blue glow on the ground. After some time they will emerge from the ground as a set of 3. Each of the 3 count as a completely separate Prop, so activating more than 1 from a set will grant more AP/Exp.
You can check Escape Portals Locations on the Map.
 Escape Portal Icon in game.
 Activated Escape Portal in game.
| Name | *Opening PortalMagical Interaction Speed | *AP/XPAdventure Points Page Experience Points Page |
|---|---|---|
Down Portal
In previous iterations of Dark and Darker, red Down Portals existed that allowed players to go down one level deeper. These have been replaced with Static Down Stairs.