From Dark and Darker Wiki
(→More Information: Expanded the Item pages onto their own bullet points since each is data heavy.) |
(meta desc change) |
||
| (8 intermediate revisions by 3 users not shown) | |||
| Line 1: | Line 1: | ||
<metadesc>Dark and Darker Wiki | <metadesc>Dark and Darker Wiki Beginners Guide</metadesc> | ||
== | ==Early Access Disclaimer== | ||
*Dark and Darker is presently in Early Access state of development. Features will be added and removed, thus the current state of the game is not representative of the final product. | *Dark and Darker is presently in Early Access state of development. Features will be added and removed, thus the current state of the game is not representative of the final product. | ||
*Many of the systems in the game are not yet finished and are in a placeholder state. Mechanics may break or not function as intended. | *Many of the systems in the game are not yet finished and are in a placeholder state. Mechanics may break or not function as intended. | ||
| Line 13: | Line 13: | ||
==What Class to Pick== | ==What Class to Pick== | ||
There are currently 8 unique classes to pick from. For more in-depth guides check [[Classes]]. If you are new many players would recommend playing | There are currently 8 unique classes to pick from. For more in-depth guides check [[Classes]]. If you are new many players would recommend playing [[Fighter]] as it is less complex and quicker to learn | ||
<div class="image-row"> | <div class="image-row"> | ||
| Line 57: | Line 57: | ||
==Leveling== | ==Leveling== | ||
In Dark and Darker, players can level up by completing various actions such as killing enemies, opening chests, using shrines, and escaping the dungeon. Leveling up is crucial as it unlocks perk slots for each character at levels 5, 10, and 15, which enhances your character's power. Furthermore, at level 20 you may pay a fee of 25 gold to unlock access to the trade guild, enabling you to buy and sell items on a player controlled market. | In Dark and Darker, players can level up by completing various actions such as killing enemies, opening chests, using shrines, and escaping the dungeon. Leveling up is crucial as it unlocks perk slots for each character at levels 5, 10, and 15, which enhances your character's power. Furthermore, at level 20 you may pay a fee of 25 gold to unlock access to the trade guild, enabling you to buy and sell items on a player controlled market. | ||
For more detailed information, refer to the [[Experience]] page. | For more detailed information, refer to the [[Experience]] page. | ||
| Line 64: | Line 64: | ||
In Dark and Darker, players can rest by default by pressing the "G" key, causing their character to sit on the ground. Sitting next to a [[Campfire_Kit|Campfire]] will allow the player to regenerate their health and spells at a high rate. Additionally, players can rest if they have taken damage and have some recoverable health or if they would like to recover spells. While resting, players recover health at a rate of 1 HP per 2 seconds (this varies based on certain stats to note). It is important to note that players are extremely vulnerable while resting as they are unable to move without performing an animation to get up. Furthermore, the [[Bard]] class can enhance the restoration rate of recoverable health to themselves and others with a song, but players must be resting. | In Dark and Darker, players can rest by default by pressing the "G" key, causing their character to sit on the ground. Sitting next to a [[Campfire_Kit|Campfire]] will allow the player to regenerate their health and spells at a high rate. Additionally, players can rest if they have taken damage and have some recoverable health or if they would like to recover spells. While resting, players recover health at a rate of 1 HP per 2 seconds (this varies based on certain stats to note). It is important to note that players are extremely vulnerable while resting as they are unable to move without performing an animation to get up. Furthermore, the [[Bard]] class can enhance the restoration rate of recoverable health to themselves and others with a song, but players must be resting. | ||
For more detailed information, refer to the [[Healing]] mechanic page. | |||
| Line 84: | Line 86: | ||
You also need to be careful to fully conceal your body parts with your shield, because even if you manage to block a hit, the weapon's hitbox can extend past your shield and hit you on uncovered body parts. Therefore, distance management is equally as important as blocking in the right direction. With this in mind, larger shields tend to offer a higher degree of protection due their their larger size. | You also need to be careful to fully conceal your body parts with your shield, because even if you manage to block a hit, the weapon's hitbox can extend past your shield and hit you on uncovered body parts. Therefore, distance management is equally as important as blocking in the right direction. With this in mind, larger shields tend to offer a higher degree of protection due their their larger size. | ||
Currently, the only | Currently, the only weapons that can execute a parry is the [[Longsword]] and the [[Flute]]. If you successfully block an attack with either, you can quickly follow up with a higher damaging 2-sting riposte animation by clicking the Right mouse button. | ||
Blocking and parrying requires a great amount of practice to pull of consistently, as you need to develop the spatial awareness around your shield/weapon as well as know your opponents weapon's move sets so do not feel discouraged if you don't learn this skill quickly. | Blocking and parrying requires a great amount of practice to pull of consistently, as you need to develop the spatial awareness around your shield/weapon as well as know your opponents weapon's move sets so do not feel discouraged if you don't learn this skill quickly. | ||
| Line 91: | Line 93: | ||
For more information feel free to check out [https://www.youtube.com/@oggieson7962/videos Oggieson's Youtube Channel] as he has made detailed videos showing how to block and parry with different weapons against most enemy types and weapons. | For more information feel free to check out [https://www.youtube.com/@oggieson7962/videos Oggieson's Youtube Channel] as he has made detailed videos showing how to block and parry with different weapons against most enemy types and weapons. | ||
== Impact Zones == | == Impact Zones == | ||
Most melee weapons operate on a Impact Zones system, meaning hitting an enemy with the tip of the weapon will deal the most damage and hitting further down on the blade/haft will deal less damage. The number of Impact Zones and their decrease in damage varies between weapons. | Most melee weapons operate on a [[Damage#Impact_Zone_Bonus|Impact Zones]] system, meaning hitting an enemy with the tip of the weapon will deal the most damage and hitting further down on the blade/haft will deal less damage. The number of Impact Zones and their decrease in damage varies between weapons. See the [[Arming Sword]]'s below. <br> | ||
<div style="display:flex; align-items:center;"><!-- | |||
--><div>[[File:Arming Sword Hitbox.png|link=|x300px]]</div><!-- | |||
--><div><!-- | |||
--><span style="color:green;"><!-- | |||
-->Green Zone deals 100% damage</span><!-- | |||
--><br><br><span style="color:orange;"><!-- | |||
-->Orange Zone deals lower damage</span><!-- | |||
--><br><br><span style="color:red;">Red Zone deals even lower damage</span></div></div> | |||
Check out [[Weapons]] to see their Impact Zones damage modifiers or the individual weapons pages to see the visual representation of the Impact Zones on the weapon itself. | |||
==Body Part Damage Modifiers== | ==Body Part Damage Modifiers== | ||
Every attack, be it melee, ranged physical projectile or magic | Every attack, be it melee, ranged physical projectile or magic projectiles will scale with damage modifiers depending on the body part that was hit. | ||
Hitting the head will deal more damage, while hitting limbs will do less. Hitting the chest will do base damage (100%). | |||
This system affects player characters as well as AI monsters so always aim for the head and avoid the legs. Note that if you hit an enemy with an attack which goes through their arm and then main body it will deal arm and not body damage. | |||
This system affects player characters as well as AI monsters so always aim for the head and avoid the legs. Note that if you | For more information, see [[Damage_Calculation#Hit_Location_Multiplier|Hit Location Multiplier]]. | ||
==Utility Quick-Slots== | ==Utility Quick-Slots== | ||
Every character has access to two sets of utility quick-slots that can be accessed with the "3" and "4" key respectively. Each set houses 3 quick-slots. To scroll through your quick-slots, press "3" or "4" multiple times until you land on your desired item. Utility items such as potions with different rarities will occupy different slots. Furthermore, every item present in your quick-slots will show up on your belt. For more information on these items check [[ | Every character has access to two sets of utility quick-slots that can be accessed with the "3" and "4" key respectively. Each set houses 3 quick-slots. To scroll through your quick-slots, press "3" or "4" multiple times until you land on your desired item. Utility items such as potions with different rarities will occupy different slots. Furthermore, every item present in your quick-slots will show up on your belt. For more information on these items check [[Utilities]]. Be aware that potions will glow in the dark while equipped in your quick-slots, which can easily give away your position in the dark. | ||
<div style="display:flex; justify-content: space-evenly; flex-wrap:wrap; padding:2%;"> | <div style="display:flex; justify-content: space-evenly; flex-wrap:wrap; padding:2%;"> | ||
| Line 115: | Line 125: | ||
</div> | </div> | ||
==Getting Prepared== | |||
You can enter a dungeon as a group with a maximum number of 3 members. When a match is found, you will be transferred to a lobby where you will wait for up to 3 minutes for the lobby to fill. Characters are immune to damage in this stage and can inspect other players inventories. It is important that you do not use up any of your important cooldowns (such as second wind as a [[Fighter]] or field rations as a [[Ranger]]) since they do not reset after you get teleported to the dungeon. Furthermore, it is not recommended you drop items or gear in the lobby, as other players can pick them up and if the match starts and your items are still on the ground, you will spawn in the dungeon without them. | |||
Normal dungeons host Common and Elite grade [[Monsters]] with an extremely low chance of spawning Nightmare monsters. Containers in this mode feature low drop rates for Epic items and extremely low drop rates for Legendary items with no chance for Unique items. | |||
It is recommended to bring some [[Utilities]] to aid you in your adventure. When possible, consider bringing a 3-stack of [[Bandage|Bandages]] and [[Potion of Healing|Healing Potions]] at the very least. | |||
A better weapon will enable you to dispatch monsters faster, this increased clear speed means you run less of a risk of taking damage and have more time for looting. | |||
==Merchants and Quests== | |||
[[Merchants]] and their [[Quests]] offer an important role in getting started. Completing quests at a merchant increases your affinity with that merchant, where higher affinity allows you to get more options from the merchant, as well as cheaper prices, and the ability to craft! | |||
The [[Squire]] is a key merchant that allows you to customize your starting loadout. Not only can you order your consumables and weapons in whichever way you prefer, but you can also choose your desired [[Armors|Armor]] and [[Weapons|Weaponry]]. Additionally, receiving affinity for particular merchants will allow you to use their weapons and armor at the Squire! | |||
==How to Resurrect== | ==How to Resurrect== | ||
To resurrect an ally you will need to locate their Soul Heart which is located in their chest armor slot. To acquire their heart you will need to remove their chest armor piece. Equip their soul heart to your utility bar then proceed to look for an [[Shrines|Altar of Sacrifice]]. After locating a Altar of Sacrifice, hold your | To resurrect an ally you will need to locate their <font style="color:rgb(0, 204, 255);">Soul Heart</font> which is located in their chest armor slot. To acquire their heart you will need to remove their chest armor piece. <br> <br> | ||
Equip their soul heart to your utility bar then proceed to look for an [[Shrines|Altar of Sacrifice]]. After locating a Altar of Sacrifice, hold your teammate's soul heart in your hand and press interact button. This initiate a channel action that will resurrect your teammate when the bar is full. Beware that cost of resurrecting your teammate is some health and they will be resurrected with minimal health unless you are a cleric that has the [[Cleric#Perks-0|Requiem]] perk. Being hit or moved will cancel this action. | |||
<br><br> | |||
Cleric also has the [[Cleric|Resurrection]] spell, with which they can resurrect dead teammates. To use this spell you must have the spell equipped on your spell wheel, with enough spell memory to wield the spell. While casting the spell you cannot move. The teammates soul heart must be on their chest slot for this spell to work. | |||
<div style="display:flex; justify-content: space-evenly; flex-wrap:wrap; padding:2%;"> | <div style="display:flex; justify-content: space-evenly; flex-wrap:wrap; padding:2%;"> | ||
| Line 144: | Line 161: | ||
==Get Rich Or Die Trying== | ==Get Rich Or Die Trying== | ||
Once you escape with your treasures, you can head over to the [[Merchants]] to see how much you've earned. You can sell your items to the right merchant, but be careful as some items are used for | Once you escape with your treasures, you can head over to the [[Merchants]] to see how much you've earned. You can sell your items to the right merchant, but be careful as some items are used for [[Quests]] so you might want to keep some of them in your stash. However, if you do not survive and extract from the dungeon, you will not keep any of your loot that you bought in including your armor, weapons, jewelery and utility items. Upon death your inventory gets reset to the default gear as configured in the [[Squire]]. | ||
==More Information== | ==More Information== | ||
| Line 152: | Line 169: | ||
Data heavy pages: | Data heavy pages: | ||
*[[Classes]] - Specific class information and some tips | *[[Classes]] - Specific class information and some tips | ||
*[[Monsters]] - | *[[Monsters]] - Monsters, elites, and boss information | ||
*[[Weapons]] - | *[[Weapons]] - Weapons and brief summaries of their attributes, abilities, and effects. Follow the links to each weapon's individual page for more in depth information. | ||
*[[Armors]] - | *[[Armors]] - Armors and their attributes. | ||
*[[Accessories]] - | *[[Accessories]] - Accessories and their attributes. | ||
*[[Utilities]] - | *[[Utilities]] - Utilities and brief summaries of their attributes, abilities, and effects. | ||
*[[Misc]] - | *[[Misc]] - Gems, hunting loot, ores, ingots, powders, currency, currency containers, and ammo. | ||
*[[Merchants]] - Merchants, sell prices, quests, and crafting. | |||
To see the all pages check the [[Dark_and_Darker_Wiki|Home Page]] | To see the all pages check the [[Dark_and_Darker_Wiki|Home Page]] | ||
Latest revision as of 23:01, 24 May 2024
Early Access Disclaimer
- Dark and Darker is presently in Early Access state of development. Features will be added and removed, thus the current state of the game is not representative of the final product.
- Many of the systems in the game are not yet finished and are in a placeholder state. Mechanics may break or not function as intended.
Getting Started
The game is currently in early access as of now and can be purchased on the official website[1]
Once you start the game, you will be presented with the Character Creation screen. You will have to create a character to be able to click the "Enter the Lobby" button. Currently, there is a limit of 8 characters. You can also check the official guide by Ironmace (Though note this may be outdated in certain aspects) and Dungeon guide.
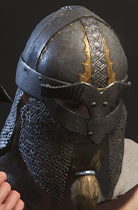
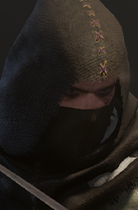
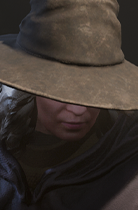
What Class to Pick
There are currently 8 unique classes to pick from. For more in-depth guides check Classes. If you are new many players would recommend playing Fighter as it is less complex and quicker to learn


Controls

Leveling
In Dark and Darker, players can level up by completing various actions such as killing enemies, opening chests, using shrines, and escaping the dungeon. Leveling up is crucial as it unlocks perk slots for each character at levels 5, 10, and 15, which enhances your character's power. Furthermore, at level 20 you may pay a fee of 25 gold to unlock access to the trade guild, enabling you to buy and sell items on a player controlled market.
For more detailed information, refer to the Experience page.
Resting and Recoverable Health
In Dark and Darker, players can rest by default by pressing the "G" key, causing their character to sit on the ground. Sitting next to a Campfire will allow the player to regenerate their health and spells at a high rate. Additionally, players can rest if they have taken damage and have some recoverable health or if they would like to recover spells. While resting, players recover health at a rate of 1 HP per 2 seconds (this varies based on certain stats to note). It is important to note that players are extremely vulnerable while resting as they are unable to move without performing an animation to get up. Furthermore, the Bard class can enhance the restoration rate of recoverable health to themselves and others with a song, but players must be resting.
For more detailed information, refer to the Healing mechanic page.
Weapon Move sets
Each weapon has its own unique move set and range. Practice and memorize them to your advantage. Some weapons have 2 unique attack move sets, one with the left mouse click and another with the right mouse click.
The arming sword for example has a 3-motion attack sequence. Holding down the primary attack button will go through the attack sequentially until it is interrupted. If the enemy is wielding an arming sword, knowing this sequence can help you evade their attack.
Blocking/Parry System
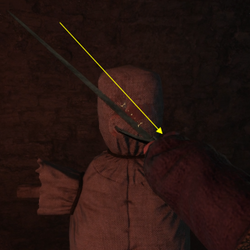
Shields and some melee weapons have a block ability. However, simply holding block does not fully protect you from frontal attacks like in other games. To complete a successful block, you need to physically intercept their weapon or projectiles with your shield/weapon before you are hit.
You also need to be careful to fully conceal your body parts with your shield, because even if you manage to block a hit, the weapon's hitbox can extend past your shield and hit you on uncovered body parts. Therefore, distance management is equally as important as blocking in the right direction. With this in mind, larger shields tend to offer a higher degree of protection due their their larger size.
Currently, the only weapons that can execute a parry is the Longsword and the Flute. If you successfully block an attack with either, you can quickly follow up with a higher damaging 2-sting riposte animation by clicking the Right mouse button.
Blocking and parrying requires a great amount of practice to pull of consistently, as you need to develop the spatial awareness around your shield/weapon as well as know your opponents weapon's move sets so do not feel discouraged if you don't learn this skill quickly.
For more information feel free to check out Oggieson's Youtube Channel as he has made detailed videos showing how to block and parry with different weapons against most enemy types and weapons.
Impact Zones
Most melee weapons operate on a Impact Zones system, meaning hitting an enemy with the tip of the weapon will deal the most damage and hitting further down on the blade/haft will deal less damage. The number of Impact Zones and their decrease in damage varies between weapons. See the Arming Sword's below.
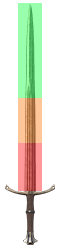
Green Zone deals 100% damage
Orange Zone deals lower damage
Red Zone deals even lower damage
Orange Zone deals lower damage
Red Zone deals even lower damage
Check out Weapons to see their Impact Zones damage modifiers or the individual weapons pages to see the visual representation of the Impact Zones on the weapon itself.
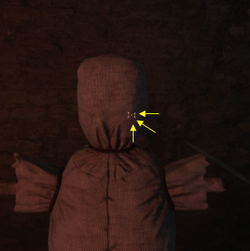
Body Part Damage Modifiers
Every attack, be it melee, ranged physical projectile or magic projectiles will scale with damage modifiers depending on the body part that was hit.
Hitting the head will deal more damage, while hitting limbs will do less. Hitting the chest will do base damage (100%).
This system affects player characters as well as AI monsters so always aim for the head and avoid the legs. Note that if you hit an enemy with an attack which goes through their arm and then main body it will deal arm and not body damage.
For more information, see Hit Location Multiplier.
Utility Quick-Slots
Every character has access to two sets of utility quick-slots that can be accessed with the "3" and "4" key respectively. Each set houses 3 quick-slots. To scroll through your quick-slots, press "3" or "4" multiple times until you land on your desired item. Utility items such as potions with different rarities will occupy different slots. Furthermore, every item present in your quick-slots will show up on your belt. For more information on these items check Utilities. Be aware that potions will glow in the dark while equipped in your quick-slots, which can easily give away your position in the dark.


Getting Prepared
You can enter a dungeon as a group with a maximum number of 3 members. When a match is found, you will be transferred to a lobby where you will wait for up to 3 minutes for the lobby to fill. Characters are immune to damage in this stage and can inspect other players inventories. It is important that you do not use up any of your important cooldowns (such as second wind as a Fighter or field rations as a Ranger) since they do not reset after you get teleported to the dungeon. Furthermore, it is not recommended you drop items or gear in the lobby, as other players can pick them up and if the match starts and your items are still on the ground, you will spawn in the dungeon without them.
Normal dungeons host Common and Elite grade Monsters with an extremely low chance of spawning Nightmare monsters. Containers in this mode feature low drop rates for Epic items and extremely low drop rates for Legendary items with no chance for Unique items.
It is recommended to bring some Utilities to aid you in your adventure. When possible, consider bringing a 3-stack of Bandages and Healing Potions at the very least.
A better weapon will enable you to dispatch monsters faster, this increased clear speed means you run less of a risk of taking damage and have more time for looting.
Merchants and Quests
Merchants and their Quests offer an important role in getting started. Completing quests at a merchant increases your affinity with that merchant, where higher affinity allows you to get more options from the merchant, as well as cheaper prices, and the ability to craft!
The Squire is a key merchant that allows you to customize your starting loadout. Not only can you order your consumables and weapons in whichever way you prefer, but you can also choose your desired Armor and Weaponry. Additionally, receiving affinity for particular merchants will allow you to use their weapons and armor at the Squire!
How to Resurrect
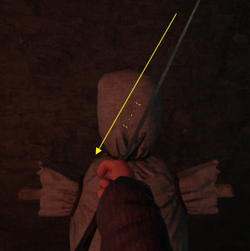
To resurrect an ally you will need to locate their Soul Heart which is located in their chest armor slot. To acquire their heart you will need to remove their chest armor piece.
Equip their soul heart to your utility bar then proceed to look for an Altar of Sacrifice. After locating a Altar of Sacrifice, hold your teammate's soul heart in your hand and press interact button. This initiate a channel action that will resurrect your teammate when the bar is full. Beware that cost of resurrecting your teammate is some health and they will be resurrected with minimal health unless you are a cleric that has the Requiem perk. Being hit or moved will cancel this action.
Cleric also has the Resurrection spell, with which they can resurrect dead teammates. To use this spell you must have the spell equipped on your spell wheel, with enough spell memory to wield the spell. While casting the spell you cannot move. The teammates soul heart must be on their chest slot for this spell to work.


High-Roller
You can enter a High-Roller dungeon as a group, with a maximum number of 3 members. High Roller dungeons have no requirements for entry but require adventurer points to enter (Adventurer points are used to determine a player's rank similar to that or a competitive system from other games). In a game, certain HUD elements will be hidden such as the kill-feed or in-game timer, although you still have the progress bar that fills up red as time goes by, giving you a rough estimation of how much time is left. One block on the red timer is approximately equal to 15 seconds but it is best to instead treat each block as 10 seconds to prevent you from running out of time during a run. There are better drop rates for high quality gear in High-Roller, but monsters will appear at Elite and Nightmare grade with common enemies only sometimes spawning. Currently high roller bosses are one of the only ways you can obtain unique grade items.
Get Rich Or Die Trying
Once you escape with your treasures, you can head over to the Merchants to see how much you've earned. You can sell your items to the right merchant, but be careful as some items are used for Quests so you might want to keep some of them in your stash. However, if you do not survive and extract from the dungeon, you will not keep any of your loot that you bought in including your armor, weapons, jewelery and utility items. Upon death your inventory gets reset to the default gear as configured in the Squire.
More Information
Data heavy pages:
- Classes - Specific class information and some tips
- Monsters - Monsters, elites, and boss information
- Weapons - Weapons and brief summaries of their attributes, abilities, and effects. Follow the links to each weapon's individual page for more in depth information.
- Armors - Armors and their attributes.
- Accessories - Accessories and their attributes.
- Utilities - Utilities and brief summaries of their attributes, abilities, and effects.
- Misc - Gems, hunting loot, ores, ingots, powders, currency, currency containers, and ammo.
- Merchants - Merchants, sell prices, quests, and crafting.
To see the all pages check the Home Page