From Dark and Darker Wiki
m (→Getting Prepared: corrected small spelling mistakes) |
|||
| Line 3: | Line 3: | ||
==Getting Prepared== | ==Getting Prepared== | ||
You can enter | You can enter a dungeon as a group, with a maximum number of 3 members. Normal dungeons have max of 18 players that will spawn in different rooms. When a match is found, you will be transferred to a lobby where you will wait up to 3 mins for the lobby to fill. Characters are immune to damage in this stage and can inspect other players inventories. It is important that you do not use up any of your important cooldowns here since they do not reset after you are teleported to the dungeon. Furthermore, do not drop your items or gear in the lobby, as other players can pick them up and if the match starts and your items are still on the ground, you will spawn in the dungeon without them. | ||
It is recommended to bring some [[Consumables]] or [[Utility]] to aid you in your adventure. | |||
==High-Roller== | ==High-Roller== | ||
You can enter | You can enter a High-Roller dungeon as a group, with a maximum number of 3 members. High-Roller dungeons have max of 20 players that will spawn in different rooms. High Roller dungeons have an entry fee of 70g per player. There will be no kill-feed or in-game timer, although you still have the progress bar that fills up red as time goes by, giving you a rough estimation of how much time is left. There are better drop rates for high quality gear. The only way to obtain unique grade items are from High-Roller dungeons. Enemies will appear as elite and nightmare. | ||
==Portals== | ==Portals== | ||
There are two different types of portals in the game one allowing you to escape and other descending you further levels down. | There are two different types of portals in the game, one allowing you to escape and the other descending you further levels down. | ||
Escape portals will only take a single person out of the dungeon. | Escape portals will only take a single person out of the dungeon. | ||
Descending Portals will spawn as a 3 person portal bunch. Allowing 3 people to descend. | Descending Portals will spawn as a 3 person portal bunch. Allowing 3 people to descend together. | ||
<div style="display:flex; justify-content: space-evenly; flex-wrap:wrap; padding:2%;"> | <div style="display:flex; justify-content: space-evenly; flex-wrap:wrap; padding:2%;"> | ||
| Line 27: | Line 27: | ||
<p style="text-align:center;">'''Descending Portal'''</p></div> | <p style="text-align:center;">'''Descending Portal'''</p></div> | ||
</div> | </div> | ||
== | ==Shrines== | ||
There are currently 5 different shrines | There are currently 5 different shrines which each give a specific buff. The shrines will regenerate over time making them reusable. These include: | ||
*Shrine Of Protection: Gives a protective buff to the player. | *Shrine Of Protection: Gives a protective buff to the player. | ||
*Fountain Of Speed: Gives a speed buff to the player allowing | *Fountain Of Speed: Gives a speed buff to the player, allowing them to move faster. | ||
*Shrine Of Health: Restores 100% of the | *Shrine Of Health: Restores 100% of the player's HP. | ||
*Shrine Of Power: Gives a damage buff to the player. | *Shrine Of Power: Gives a damage buff to the player. | ||
*Alter of Resurrection: Allows you to resurrect fallen players with the sacrifice of your own HP. You will need Soul Heart. | *Alter of Resurrection: Allows you to resurrect fallen players with the sacrifice of your own HP. You will need to equip the Soul Heart of the fallen player. | ||
<div style="display:flex; justify-content: space-evenly; flex-wrap:wrap; padding:2%;"> | <div style="display:flex; justify-content: space-evenly; flex-wrap:wrap; padding:2%;"> | ||
| Line 54: | Line 54: | ||
The dungeons below are protected by a powerful curse. The Death Swarm will try to consume your soul. Heed the mini-map and avoid its oppressive clutch. | The dungeons below are protected by a powerful curse. The Death Swarm will try to consume your soul. Heed the mini-map and avoid its oppressive clutch. | ||
The circle will slowly move | The circle will slowly move closer towards the white circle indicated on the mini-map. If you are caught in the red zone you will slowly start taking damage. However, if you are in the last circle and cannot find a portal in time before the circle fully closes, then you will instantly die. | ||
<div style="display:flex; justify-content: space-evenly; flex-wrap:wrap; padding:2%;"> | <div style="display:flex; justify-content: space-evenly; flex-wrap:wrap; padding:2%;"> | ||
| Line 68: | Line 68: | ||
There is a variety of [[Enemies|enemies]] depending on the room you enter and map you get into. | There is a variety of [[Enemies|enemies]] depending on the room you enter and map you get into. | ||
The lower level | The lower level the dungeon, the harder the enemies become and different types of enemies start to appear. | ||
Enemies also have 3 different variants: | Enemies also have 3 different variants: | ||
| Line 78: | Line 78: | ||
with each variety increase, the enemy gets stronger, tougher and faster. | with each variety increase, the enemy gets stronger, tougher and faster. | ||
Nightmare can only spawn in High Roller | Nightmare enemies can only spawn in High Roller dungeons. | ||
There are mini bosses starting from level 2 however, only way to kill bosses | There are mini bosses starting from level 2, however, the only way to kill bosses is by going down to the level 3 dungeon, by descending into it. | ||
==Looting== | ==Looting== | ||
| Line 91: | Line 91: | ||
*Dungeon Basement level 1 (Difficulty Normal): This is currently in development. | *Dungeon Basement level 1 (Difficulty Normal): This is currently in development. | ||
*Dungeon Basement level 2 (Difficulty Hard): This level is currently the starting level for everyone and there are two different maps Crypt 1 and Crypt 2. Loot quality is set to be poor to epic. | *Dungeon Basement level 2 (Difficulty Hard): This level is currently the starting level for everyone and there are two different maps Crypt 1 and Crypt 2. Loot quality is set to be poor to epic. | ||
*Dungeon Basement level 3 (Difficulty Hell): This level is only available through surviving and entering red portals. There are two different maps Inferno 1 and Inferno 2 with their unique bosses. Loot quality is set to be rare to unique. All enemies are set to be Elite. | *Dungeon Basement level 3 (Difficulty Hell): This level is only available through surviving and entering red portals. There are two different maps, Inferno 1 and Inferno 2 with their unique bosses. Loot quality is set to be rare to unique. All enemies are set to be Elite. | ||
*High Roller Dungeon: These dungeons will have higher quality loot however every single enemy will be elite. | *High Roller Dungeon: These dungeons will have higher quality loot, however, every single enemy will be elite or higher. | ||
You can navigate easier with the use of wiki's [https://darkanddarker.map.spellsandguns.com/ map]. | You can navigate easier with the use of the wiki's [https://darkanddarker.map.spellsandguns.com/ map]. | ||
==Crypt== | ==Crypt== | ||
[[File:Crypt.png|right|x250px]] | [[File:Crypt.png|right|x250px]] | ||
Crypt is normally to be the second | The Crypt is normally going to be the second level of dungeon in the game. However, there is no level 1 at the moment. | ||
Therefore, when you join the game, you start | Therefore, when you join the game, you start in this dungeon. | ||
New ores spawn in Crypt: | New ores spawn in Crypt: | ||
| Line 116: | Line 116: | ||
==Inferno== | ==Inferno== | ||
[[File:Inferno.png|right|x250px]] | [[File:Inferno.png|right|x250px]] | ||
Inferno is the most difficult dungeon in the game at the moment. It can be reached by using down portal from Crypt Dungeon. | Inferno is the most difficult dungeon in the game at the moment. It can be reached by using the down portal from the Crypt Dungeon. | ||
While it is the most difficult dungeon, it is also the smallest dungeon. | While it is the most difficult dungeon, it is also the smallest dungeon. The center piece of the dungeon is always one of the bosses' rooms. | ||
There is no new ore for this level atm. Therefore, it uses [[Rubysilver Ore]] same as Crypt. | There is no new ore for this level atm. Therefore, it uses [[Rubysilver Ore]] same as the Crypt. | ||
Many new enemies spawn here, such as: | Many new enemies spawn here, such as: | ||
| Line 136: | Line 136: | ||
==Leaderboards== | ==Leaderboards== | ||
High Roller Dungeons are the only way to obtain a spot on the leaderboard. The leaderboards | High Roller Dungeons are the only way to obtain a spot on the leaderboard. The leaderboards include: | ||
*Veteran Adventurer: | *Veteran Adventurer: | ||
*Treasure Collector: Top looting scores. | *Treasure Collector: Top looting scores. | ||
Revision as of 02:53, 31 December 2022
Getting Prepared
You can enter a dungeon as a group, with a maximum number of 3 members. Normal dungeons have max of 18 players that will spawn in different rooms. When a match is found, you will be transferred to a lobby where you will wait up to 3 mins for the lobby to fill. Characters are immune to damage in this stage and can inspect other players inventories. It is important that you do not use up any of your important cooldowns here since they do not reset after you are teleported to the dungeon. Furthermore, do not drop your items or gear in the lobby, as other players can pick them up and if the match starts and your items are still on the ground, you will spawn in the dungeon without them.
It is recommended to bring some Consumables or Utility to aid you in your adventure.
High-Roller
You can enter a High-Roller dungeon as a group, with a maximum number of 3 members. High-Roller dungeons have max of 20 players that will spawn in different rooms. High Roller dungeons have an entry fee of 70g per player. There will be no kill-feed or in-game timer, although you still have the progress bar that fills up red as time goes by, giving you a rough estimation of how much time is left. There are better drop rates for high quality gear. The only way to obtain unique grade items are from High-Roller dungeons. Enemies will appear as elite and nightmare.
Portals
There are two different types of portals in the game, one allowing you to escape and the other descending you further levels down.
Escape portals will only take a single person out of the dungeon.
Descending Portals will spawn as a 3 person portal bunch. Allowing 3 people to descend together.
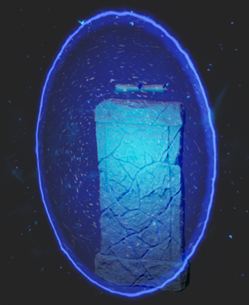
Escape Portal
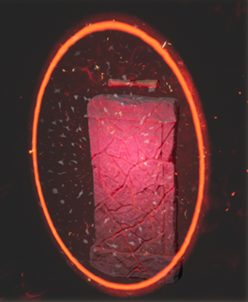
Descending Portal
Shrines
There are currently 5 different shrines which each give a specific buff. The shrines will regenerate over time making them reusable. These include:
- Shrine Of Protection: Gives a protective buff to the player.
- Fountain Of Speed: Gives a speed buff to the player, allowing them to move faster.
- Shrine Of Health: Restores 100% of the player's HP.
- Shrine Of Power: Gives a damage buff to the player.
- Alter of Resurrection: Allows you to resurrect fallen players with the sacrifice of your own HP. You will need to equip the Soul Heart of the fallen player.

Shrine Of Protection

Fountain Of Speed

Shrine Of Health

Shrine Of Power
Altar Of Resurrection
Death Swarm
The dungeons below are protected by a powerful curse. The Death Swarm will try to consume your soul. Heed the mini-map and avoid its oppressive clutch. The circle will slowly move closer towards the white circle indicated on the mini-map. If you are caught in the red zone you will slowly start taking damage. However, if you are in the last circle and cannot find a portal in time before the circle fully closes, then you will instantly die.

Death Swarm

Red Zone
Enemies

There is a variety of enemies depending on the room you enter and map you get into.
The lower level the dungeon, the harder the enemies become and different types of enemies start to appear.
Enemies also have 3 different variants:
- Normal
- Elite
- Nightmare
with each variety increase, the enemy gets stronger, tougher and faster.
Nightmare enemies can only spawn in High Roller dungeons.
There are mini bosses starting from level 2, however, the only way to kill bosses is by going down to the level 3 dungeon, by descending into it.
Looting
Once you escape with your riches, you can head over to the Merchants to see how much you've earned. You can sell your items to the right merchant. However, if you do not survive you will not keep any of your loot including your armor, weapons, jewelery and utility items. You will start your next adventure will default character loot.
Difficulties
There are 3 different difficulties of dungeons:
- Dungeon Basement level 1 (Difficulty Normal): This is currently in development.
- Dungeon Basement level 2 (Difficulty Hard): This level is currently the starting level for everyone and there are two different maps Crypt 1 and Crypt 2. Loot quality is set to be poor to epic.
- Dungeon Basement level 3 (Difficulty Hell): This level is only available through surviving and entering red portals. There are two different maps, Inferno 1 and Inferno 2 with their unique bosses. Loot quality is set to be rare to unique. All enemies are set to be Elite.
- High Roller Dungeon: These dungeons will have higher quality loot, however, every single enemy will be elite or higher.
You can navigate easier with the use of the wiki's map.
Crypt

The Crypt is normally going to be the second level of dungeon in the game. However, there is no level 1 at the moment.
Therefore, when you join the game, you start in this dungeon.
New ores spawn in Crypt:

New mini bosses spawn in Crypt:
To learn more about enemies, check Enemies
Inferno

Inferno is the most difficult dungeon in the game at the moment. It can be reached by using the down portal from the Crypt Dungeon.
While it is the most difficult dungeon, it is also the smallest dungeon. The center piece of the dungeon is always one of the bosses' rooms.
There is no new ore for this level atm. Therefore, it uses Rubysilver Ore same as the Crypt.
Many new enemies spawn here, such as:
Also end game bosses:
To learn more about enemies, check Enemies
Leaderboards
High Roller Dungeons are the only way to obtain a spot on the leaderboard. The leaderboards include:
- Veteran Adventurer:
- Treasure Collector: Top looting scores.
- Killer Outlaw: Amount of kills scored.
- Escape Artist: Times escaped.
- Lich Slayer: Amount of times Lich has been killed.
- GhostKing Slayer: Amount of times GhostKing has been killed.